The Best Way to Treat Golfers Elbow?

Do you experience pain when performing gripping tasks such as washing your hair and holding a pan?

These are an indication of golfer’s elbow. Golfer’s elbow is also known as ‘medial epicondylitis’. Golfer’s elbow usually comes on gradually over time and is an uncomfortable niggle in the morning or with aggravating activities before it develops into a painful injury causing loss of function. Most elbow movements will be pain-free, however specific gripping movements are often painful such as swinging a golf club.

Golfer’s elbow is not an inflammatory condition. It can have some inflammation originally; however, it is a tendinopathy condition which is generally caused by overuse of these specific muscles. Small degenerative changes occur in the common tendon of these flexor muscles which produces the pain.

Rehab is critical for this condition to prevent further degenerative changes which are unable to be reversed. Specific exercises and a gradual loading program are often successful with individuals suffering golfer’s elbow.

Immediate management involves avoidingactivities that exacerbate pain in the area, especially those that require repetitive wrist flexion (bending wrist forwards) and forearm pronation (palm facing downwards to the ground). However, rest is NOT the answer. Decreasing load is important, however complete rest will slow down your recovery and reproduce symptoms as soon as you commence flexion activities again.

Icing can alleviate pain as well as decrease swelling if this is present. Icing should also be undertaken following every strengthening session throughout rehab.

Applying massage to the muscles on the inside of the forearm can help reduce tension and tightness in these muscles. This will improve their function which long term should help reduce the strain on the tendon at the elbow.

Strengthening exercises to help manage Golfer’s elbow

As with tennis elbow, it is normal to feel some pain during and/or after rehab sessions, however it is best to scale the degree of pain. 0 is no pain at all and 10 is excruciating pain. The pain felt throughout rehab and exercise should not be more than 3/10. In addition, pain should not be worse the following morning or 24 hours after your session. If this is the case the tendon has been overloaded.

The below 2 exercises are a good starting point to decrease your pain. They shoulder be performed 3-5 times per day.

  • Isometric wrist flexion for 30 seconds (see below)
  • Isometric grip strength for 30 seconds

These can eventually be progressed to exercises such as:

  • Eccentric wrist flexion
  • Eccentric-concentric wrist flexion

For more advice and treatment on golfer’s elbow or elbow pain come and visit one of our physiotherapists at Glenferrie Sports and Spinal Clinic in Hawthorn. We will have you performing functional activities and returning to sport as soon as possible following a rehabilitation and gradual loading program tailored to your needs.

Why Rehabilitation is just like a Fairytale!

The three bears find Goldie locks asleep in a bed.

Rehabilitation is a complex thing but just like the fairytale Goldilocks and the Three Bears, if you get it just right it can be quite simple.

Just like Goldilocks, finding a fair middle ground is best. I find that the people who go too hard with their exercises do the worst at rehab. All you are doing is stirring up the inflammation which just makes you like a bear with a sore head!

Doing nothing will mean you get sore and stiff. Weakness will soon follow and you will soon be as stable as a house of sticks! We all know how that one ends.

But how do you find the happy ground?

What is the holy grail of rehabilitation?

Unfortunately there is no magic bean to guide us here. Everyone is different. Each day presents different challenges and as time goes on our ability to push harder improves.

Accommodation is the process in which progressive overloading of the bodies structures causes them to strengthen in the patterns in which we move. It’s a vital part of rehabilitation but it needs to be done in conjunction with the natural rates of healing.

Soft tissues generally take about 6 weeks to heal.

Bones, 6- 12 weeks depending upon where they are in the body.

Tendons with their poorer blood supply take ages (up to 12 months).

Throw in age, activity, co morbidities and we get a really complex matrix beginning to form.

Then there’s pain!

Pain is amongst other things physical, chemical, social, psychological. It’s a bit like the seven dwarfs.

How we react and perceive these things will influence how we perceive and react to pain. This is why no two recoveries are the same.

Physios like to talk about good pain and bad pain.

Good pain is more like a stretching and working pain and its generally something tolerable and can be encouraged. It will settle fairly soon following workouts.

Bad pain is more searing and stabbing. It typically doesn’t settle so well and may last overnight and the next day. We like to avoid this pain.

So now you know the variables for recovery, how do you find the best option for you?

Firstly listen to your body. It will tell you how it’s feeling; you just need to learn how to listen to it. When starting with rehab, taste test first.

Start slowly.

See how you recover and if it pulls up well, then next time you exercise you can do a little more.

Be careful because it’s sometimes not sore until you’ve finished and by then its too late. Sooner or later you will learn how the area reacts and you will be able to predict how much to do with more certainty.

Rehab is not linear. Especially not in its micro form. Patients often don’t realise the progression they are making. It’s a bit like watching grass grow. You’ll find others will see your progression more than you. Comments like “you are moving much better” are common.

Working with your physiotherapist is really helpful to help you progress with your rehabilitation. See them more as your teacher or coach who will guide you through the weeks or months in order to get you back to all your normal activities. They will help to remind you that you are on track, when to push harder or when to back off. They are skilled to understand the time frames for recovery and when to commence working different structures following injury or an operation. They understand the “just right in between” balance you’ll need to find.

How To Identify If You Have A Sprained Foot?

As winter sports start up again, we been seeing more and more Sprained Foot injuries. We thought we should shed some light on the injury so you can identify the symptoms and insure you are receiving the correct treatment.

So what does it mean if I’ve sprained my foot?

Great question, the term sprain is often misunderstood, let me shed some light on that for you.

Here goes, a sprained foot is when you damage or tear the connective tissue – such as ligaments, cartilage and joint capsules – of one or more joints in the foot.

During certain movements of the foot, activities such as landing after jumping on an uneven surface or with the foot in an awkward position or even rolling an ankle can cause stretching or compression forces that are placed on the joints within the foot.

If these forces are excessive in the sense of too much repetition, or of high impact, injury to the joints are more likely to occur. This injury is known as a sprained foot and may affect one or more joints.

How will I know if I’ve sprained my foot? What will it feel like?

Trust me- you’ll know!

It feels nasty.

Here’s some important info for you.

Patients with a sprained foot will often experience a sudden onset of pain during the activity they are par-taking in.

This pain can also carry over to the next morning, where they will often experience pain and stiffness.

Many patients who suffer from a sprained ankle will experience pain on the top, bottom or side of the affected joint. Occasionally this pain can be referred into the toes or ankle on the affected side of the foot.

These symptoms are often only noticed when matched with activities that place pressure on the affected joint. These can be things such as standing, walking, running, standing on tippy toes, etc.

It is also common for patients to experience bruising or swelling when the case is more severe. This can cause walking with a limp.

Patients suffering from a sprained foot can also feel pain when firm pressure, like touching, is applied to the affected area.

What should I do if I sprain my foot?

Take action quickly is my advice!

Your therapist will guide you in the next step and provide you stretches and exercises for you to do. It will begin with initial, basic exercises and eventually progress to more intermediate exercises.

These will be proscribed to you depending on the severity of the sprain, and how well you are progressing.

Returning to sport or other normal activity can usually occur within 2-6 weeks, in the case of a minor to moderate foot sprain.

This can be achieved by following an appropriate management and treatment plan.

For patients who suffer a more severe injury will usually require a longer period of rehabilitation to gain back optimum function.

If you are suffering with a sprained foot, or are unsure if you have sprained your foot, please contact us at the office and one of our experienced therapists will help you out. Our number is 03 9815 2555 or book online here

How to manage an Achilles Rupture Conservatively?

What is an achilles rupture?

Achilles rupture is where the achilles tendon that joins the calf to your heel tears. Typically this means surgery; however conservative management is a viable option.

The calf muscle is the one that allows us to push down through our toes and raise on our toes.

It’s really important in walking running and jumping.

A torn achilles makes general life very difficult.

It tends to occur in middle aged persons, hence its nickname “the old mans disease”. David Beckham, Kobe Bryant and Jarryd Roughead have all been victims.

Why choose conservative management for Achilles Rupture?

A few years ago, a patient who is quite holistic, approached a surgeon I work closely alongside wanting conservative management for her recently torn achilles.

Her brother was an Orthopaedic Specialist in Germany. He suggested that a non operative approach was the best way to manage an achilles rupture.

My experience was certainly based around rehabilitation post surgical reconstruction, as was the surgeons I work with. However she talked us around, and with her brothers protocol in hand we nursed her through the next few months back to full recovery. She was happy, and it set the ball rolling for us.

Whilst we didn’t then treat every patient from then on conservatively, when patients were not a great surgical candidate we went the conservative route.

These patients too did well. And so gradually we started to see more and more clients who were choosing the non operative route.

Now, if it were my achilles that was torn, I would manage it conservatively.

So whats the difference between conservative and operative Achilles Rupture Management?

Well obviously one requires an operation to sew the torn ends back together and the other leaves the job for mother nature.

This means that there is a whole list of complications that operations can cause that are not apparent with conservative management.

Firstly, feet are slow healers. As such one of the biggest issues with achilles repair is wound breakdown and infection.

This can cause massive delays in the rehabilitation process.

It also means you have to take it easy for the first few weeks. Think lots of foot elevation to ensure the wound heals.

Because there is also an incision and stitches, pain is also an issue.

And then there is also the risks of having an anaesthetic.

Conservative management lets mother nature do the job along with a structured rehabilitation program.

Whats the difference in the rehabilitation?

Rehabilitation for both of the procedures is similar.

A gentle progression of weight bearing, stretching and strengthening exercise commence in the first few weeks.

A boot is worn to protect the achilles through the first few months and this is gradually weaned as the strength and range returns.

I prefer the Vacoped as it has all the bells and whistles to progress patients through the next few months; its also handy to have a spare liner as they tend to get stinky!

How long does it take to recover an Achilles Rupture?

I tell patients with both procedures that it will take about 12 months to recover.

But by 4-6 months they shall be moving around gently without too much issue.

Heavier loads can commence as ability allows from this period, but it’s really 12 months before they don’t think about their injury any more.

What are the Outcomes?

Well some studies say there is no difference between the two for long term outcomes.

I am still learning the long term effects (its only positive), but I work on under promise and over deliver, so as such, I tell patients that there is a 10% change of re-rupture over surgical management.

There may also be a small weakness compared with the other side, but this would be generally unnoticeable in the population we are speaking with.

If you play competitive sports, then I tend to recommend surgical intervention.

Time of rehabilitation is roughly the same, but the conservative program is easier in the first few weeks as you are walking on the foot sooner, and you don’t need to spend the first two weeks with your foot elevated following surgery.

Either way however, you are going to get pretty good on crutches.

In light of all this, we are seeing more and more patient adopt the conservative route, with great outcomes to boot.

I have only had one fail, but he was an older man who stepped into a rabbit hole in the early stages of his recovery.

As such, I tend to suggest conservative to all my achilles ruptures.

Glenferrie Sports and Spinal Clinic is located in Hawthorn. Situated conveniently near public transport and with convenient parking it is central to Camberwell, Kew, Richmond, Toorak and Malvern.

For appointments call 03 9815 2555, or book online here

Top 5 things I wish I knew when starting out Physio!

I’ve just finished having a final year physiotherapy student in his last placement before graduating. It got me thinking back over 25 years ago to when I was in the same position and what things I would have wished I knew then what I know now. 

Whilst the profession has changed so much in this period, a lot of the things that are important haven’t. 

So here are my top 5 things that I wish I understood from the start.


Listen to your patient. 

This is important for so many reasons.

 A wise person said you have two ears and one mouth for a reason. 

Listen to what the patient is saying. It will help you get to the real reason that they are coming for help. 

The niggly thigh pain running may be because they are sitting incorrectly at a desk for long periods of time. 

Failure to address the cause will fail to manage the problem

There’s no point making a runner out of someone who hates running. Likewise why stop rehab at walking for the patient who is obsessed with running?

Ive often thought that Physio’s are the hairdressers of the medical world. Clients spend quality time with their therapists and often will debrief upon them. Sometimes they just need someone to listen. Be that person.


Educate more.

Therapists think they educate more than they do and patients want more information than they get. 

The simple answer is educate your patients more. 

But show; don’t tell. 

Teach them the whys and hows and they will happily follow your advice. Tell or dictate to them and you can lose their confidence. 

Dumping a whole load of information on your patients is just going to overwhelm them. Use models, charts, videos, etc to teach your patient what is wrong. 

Ensure they walk out with a good understanding on what the problem is. This will stop them reaching out to Dr Google; we all know how that’s going to work out right! 

Also I find managing patients expectations to be really important. 

I take the view of underpromise and over deliver. Often quite the opposite too many specialists. There’s a big difference between being allowed to do a task of skill and being actually able to do it. 

Setting a high bar can often lead to patient disappointment which is undue. Likewise the opposite is when someone gets back within the time frame you predicted, they are happy. Don’t make it difficult for yourself. Rome wasn’t built in a day!


Value your hands.

You can’t learn feel. 

Physiotherapy is a profession where we touch. 

We touch to examine and we touch to guide, release and move body parts. 

Touch is a very powerful tool in treating human beings. 

Value and respect this. 

Every time you touch someone think about what you are feeling. 

Is it soft or hard?  

Is it twinging or loose? 

Is there give or a hard end feel? 

How does it compare to the other side? 

Discerning these things will help you to really focus upon the issue, and make treatment better. Your patients will have enormous trust in you when you can tell them where the sore points are before they tell you.


Treat the Chain.

Always think of the kinetic chain. 

What’s happening above and below the affected area. 

Is the foot influencing the knee, what’s going on in the pelvis? 

Failure to address the areas along the kinetic chain will either result in the condition not improving; or if it does it will surely return. 

Assess movement patterns and the functional movements to see what’s going on. Is the movement correct, is their compensation or tricking going on? 

Knowing these things will assist in fixing the problem.


Get bang for your buck with your exercises.

Whilst it is important to start off with specific exercises in the rehabilitation process, as soon as you can move to functional exercises. 

Humans move quite specifically. 

We push, we pull, we rotate. 

Exercise the patient as we move, it will return them to functional movement and activity sooner. Also people are often time poor. 

Giving them 15 exercises is going to result in none of them getting done. 

Giving them 5 that involve multiple muscle groups moving in a functional plane is quicker and going to give the patient more than the other 15 anyways. 


So there it is. My top 5 things I wish I knew 25 years ago when I started. I was lucky enough to work with many great people who have taught me over the years. It’s never too late to learn. The more you know, the more you know you don’t know, the more you know you need to know!


Finger Injuries

Glenferrie Sports and Spinals Hand Therapist Hamish Anderson discusses finger injuries and the importance of early management to promote quick return to function

watch Hamish Anderson talk on finger injuries

Glenferrie Sports and Spinal Clinic is located in Hawthorn. Situated conveniently near public transport and with convenient parking it is central to Camberwell, Kew, Richmond, Toorak and Malvern.

For appointments call 03 9815 2555, or book online here

Sleep and Sport

Do your sleeping habits impact on performance?

How well do you sleep? Did you know that sleep, or more importantly lack thereof will have a serious impact upon your performance on the baseball diamond. Lack of sleep can come from a variety of ways. Perhaps you’ve just had a baby, you have stress at work, you are travelling to a tournament and it’s all exciting. There are many ways that sleep can be disrupted, however there are thankfully many things that you can do to help.

People have genetic dispositions to how they sleep. Some are night owls and struggle to sleep until late at night, others are known as larks. They like to rise and go to bed early. But what if the routine does not suit this? Lack of sleep creates what is called a sleep debt; for example if you need 8 hours sleep and you only get 7, then you are one hour in debt. This can accumulate over time, and needs to be paid back at some point. Too much sleep debt can have a negative impact upon your cognitive, physical and social wellbeing.

For teenagers the more sleep the better. If you have less than 5 hours sleep a night for a week, your testosterone levels will drop by 15%. This will have a severe impact on your ability for developing strength and power.

If you have an hour less sleep than you need you will have nearly 2 times more chance of injury. Sleep is also the best tool for recovery, so it will take you longer to feel better after competing or injury. You also have poorer motor learning when you are tired, so learning new skills will be more difficult. Think about that the next time you go to a tournament and you are up all night.

The latter part of the night is also where REM sleep occurs, if you are cutting this off you are losing a ton of quality sleep. So get to bed earlier if you need or are likely to wake up early.

So what are the obstacles that are preventing you from sleep? Phone and tech, noise, light, distractions and pain are some. In order to sleep well you need to first address the obstacles. Life (and Baseball) is based on routine. Make sure you have consistent sleep hygiene or patterns. Train yourself to sleep well, develop a routine. Here are some tips to help you with this.

Be consistent: Establish a consistent sleep schedule by going to bed and waking up at the same time every day. Our bodies like regularity and with a regular sleep schedule, it will naturally start to anticipate sleep.

Sleep in a cave: Make your bedroom cave-like–dark, quiet, and cool. Blackout curtains are strongly recommended. Earplugs can minimise noise, and a fan can circulate air while blocking out other noises. Cooler temperatures are better for sleep, so start at 20 degrees and decrease the temperature a few degrees each night until you find the right temperature for you.

Establish a routine: Develop and stick to a 20- to 30-minute routine before bed. Adopt a practice such as reading or listening to music so that your body knows sleep is near.

Bathroom before bed: Hydrate during the day and minimise liquids one to two hours before you sleep. Use the bathroom before bed to cut down on awakenings.

Avoid electronic screens: Stay away from TV, laptops, and video games one hour before bed. The emitted light can prevent sleep.

Avoid caffeine and alcohol: Refrain from caffeine after 3 p.m. Alcohol can prevent REM sleep and fragment sleep during the second half of the night.

Watch your diet: Cherry Juice can help; some Major League teams use this to also assist with recovery. Melatonin has varying benefits across individuals; it can work well for some but not others. Quality control can be an issue with manufacturing processes and therefore may disrupt rather than help your sleep. Avoid fatty and sugary foods just before bedtime.

For sleep only: Reserve your bedroom and bed for sleeping only. Don’t watch TV, eat, or do work in bed.

Get enough sleep: Obtaining eight to 10 hours of sleep every night, and not just before a game or competition, is critical. Ten- to 30-minute power naps provide a two- to three-hour boost in alertness and performance. Be cautious of longer naps, which can result in sleep inertia (feelings of grogginess) upon awakening from deep stages of sleep. Eliminate naps if you have difficulty sleeping at night.

Pay off your sleep debt: Chronically obtaining less sleep than your body needs builds a sleep debt over time. For optimal functioning and sports performance, you should eliminate your sleep debt by gradually extending your sleep duration, such as increasing from your typical seven hours per night to seven and a half hours for one week, then eight hours per night the following week.

Be patient: Reducing your sleep debt takes more than one night or weekend of good sleep!

So now you know how important sleep is for your baseball, are you getting enough?

Glenferrie Sport and Spinal specialise in managing baseball injuries. Located centrally in Hawthorn, they are well situated to manage all your baseball injuries

FINGER PAIN

Glenferrie Sports and Spinals Hand Therapist Hamish Anderson discusses finger injuries and how to manage them.

So you were kicking the footy, or bouncing a basketball, when the ball collected the end of your finger and it really hurt. Now your finger is swollen and hurts to move. What do you do?

How do I treat my finger pain?

Well what you do actually depends on two things.

  • Did the joint dislocate or pop out of place?
  • Can you bend and straighten the affected joint now?

If the answer to question one is YES (but the finger is now in place and you can move it again without it popping out) or NO, then it is likely that you will be okay with a bit of care from a hand therapist and  some time.

Light compression and ice may help with the swelling. You may need an x-ray to confirm that the joint is in the right spot and that you don’t have a bad fracture. Buddy taping may be sufficient, or you may need to wear a splint. Having some time off sport and learning how to protect the finger may also be important. The hand therapist can assist you with that.

If the answer to question one is YES but you are not certain the joint is back in place, and your movement is affected, then you will need to get an xray immediately. You may need help to re-locate the joint, and you will almost certainly need help to get the finger moving again. In any case, you must get clear advice as to what is going on with the joint.

If the answer to question two is NO, then what happens next depends very much on A.) which joint is affected and B.) what structure is injured. This is easy to determine in the clinic, less so on Google. So I’d suggest you have a professional look at the finger immediately. Your hand therapist can help with this and will let you know exactly what needs to be done.

If the answer to question two is YES, then the fact that you are looking for help would indicate that a visit to the hand therapist is warranted. He or she can advise you on exercises, how to protect the joint so that it heals strongly, and all the do’s and don’ts associated with recovery.

Finger injuries are often ignored, with the result that a preventable problem becomes a painful and chronic reality. These injuries are not only painful but they can have long lasting repercussions. Your hands help you interact with the world and deserve to be looked after. We can help with that so that the next time a bouncing ball comes your way you are ready!

Glenferrie Sports and Spinals Hand Therapist is centrally located and centrally in Hawthorn servicing Surrounding suburbs Kew, Richmond, Camberwell, Toorak, Malvern and Collingwood. For appointments with Hamish call 03 9815 2555 or book online www.glenferriessc.com.au

Anatomy of Throwers

Performance Plus is very precise in the wording of human movement, so here are few diagrams that cover the basic movements of the arm and muscles involved with throwing!

Pronation and Supination

This is the movement of putting the palm up and down.

Planes of Movement

Flexion – decreasing the angle in the saggital plane

Extension- Increasing the angle in the saggital plane

Abduction – Moving away from the midline

Adduction – Moving towards the midline

Circumduction – Moving in a circular motion

Internal and External Rotation

Internal Rotation – Rotating in towards the midline

External Rotation – Rotating away from the midline

Planes of Movement

Arm Muscles

Lower Limb Muscles – Front

Lower Limb Muscles – Back

Mechanisms of Adaptation: How We Improve

Systematic strength training produces structural and functional changes, or adaptations, in the body. The level of adaptation is evidenced by the size and strength of the

muscles. The magnitude of these adaptations is directly proportional to the demands placed on the body by the volume (quantity), frequency, and intensity (load) of training, as well as the body’s capability to adapt to such demands. Training rationally causes the muscles to adapt to the stress of increasing physical work. In other words, if the body is presented with a demand rationally greater than it is accustomed to and enough recovery time is given to trained physiological systems, it adapts to the stressor by becoming stronger.

Neural adaptations to strength training mechanisms to decrease the inhibition of muscle recruitment, as well as intra- and intermuscular coordination improvements.

As you continue to train using PlyoCare balls for arm care and mechanical smoothing, your arm gets stronger and your mechanics become more efficient. After all, those are the goals of the program! However, over time, these workouts become part of what you must do. They now form the “maintenance” cycle that you must continue for years on end to ensure your arm stays healthy and your mechanical pattern does not regress. These exercises no longer improve your arm strength or delivery, but they do reinforce it and keep it solid. To make further improvements, you will need to increase the stress levels or change the modality of training.

Adapting to the workout determines how your maintenance program will be chosen and designed. What used to be a gruelling workout that taxed your body will now simply become your daily warm-up. This is a clear adaptation to the stressor and shows that you have become significantly stronger and holds true across all domains – strength, endurance, plyometric ability, etc.
Multi-factor training is the method by which this program improves your ability level across many domains simultaneously to maximise overall gains. All throwing drills done near high intensities are multi-factor – many changes are happening, though not all of them are good:

• Physical mechanical patterns are changing based on the demand / drill being performed (good)

• Positive structural changes are occurring (muscle recruitment, increased mobility around targeted joints – both good)

• Central nervous system is becoming more efficient at coordinating motor units (good)

• Negative structural changes can occur due to initial faulty technique and/or general stress (decreased internal rotation of the shoulder, decreased elbow flexion/extension range of motion – both bad)

Article reproduced from Driveline Baseball

Interval Running Training for Baseball

Interval training is a type of training that involves a series of low- to high-intensity workouts interspersed with rest or relief periods. The high-intensity periods are typically at or close to anaerobic exercise, while the recovery periods involve activity of lower intensity. Varying the intensity of effort exercises the heart muscle, providing a cardiovascular workout, improving aerobic capacity and permitting the person to exercise for longer and/or at more intense levels.

Trouts

This is an interval training based program designed to enhance cariorespiratory  fitness trough repeated efforts.

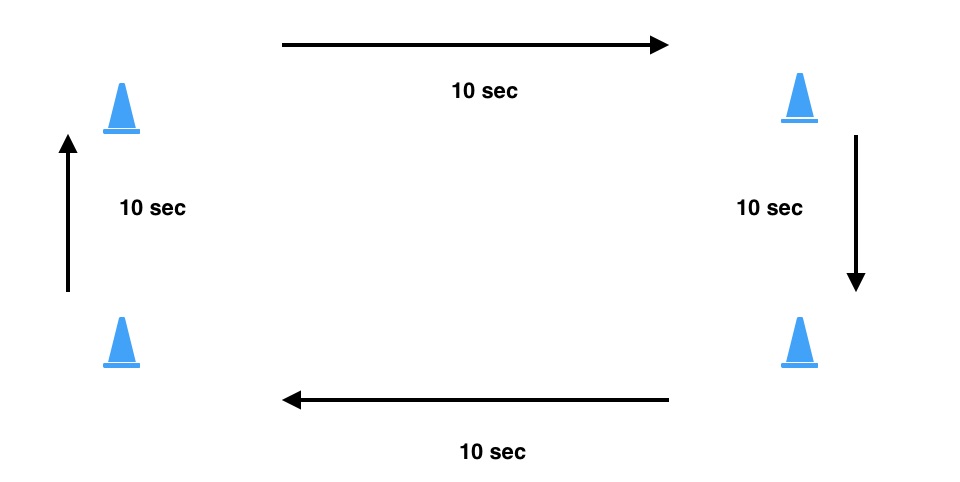
Mark out a rectangle 55m x 25 m with cones. You have 10 seconds to go between each cone.

Set 1  4 minutes (2 min rest)

Set 2 3 minutes (2 min rest)

Set 3 2 Minutes

To make more difficult, reduce the time for each side eg 8 seconds for each side. its not recommended to increase the distance as it is not really relevant to baseball.

Plyometric Training for Baseball and Cricket

Wall Balls

Rotational throws are the best technique for developing power in the core and hip muscles. These exercises are particularly good for hockey, golf, tennis, baseball, and any other sport that requires explosive rotary action. Medicine ball throws develop hip power by teaching the athlete to better utilise hip internal and external rotation to draw power from the ground. The goal is not torso rotation but rather powerful hip rotation. The objective is to learn to transfer ground forces through a relatively stiff and stable core.

Bounding

The basic Bound is extremely simple to perform. You leap off one leg, attempting to propel your body forward as far as you can. You land on your opposite foot and immediately explode into the next bound. It’s like an exaggerated sprint stride with an emphasis on springing off the ground. The transition is what makes the move so effective and what makes it a plyometric exercise, because it trains the Stretch-Shortening Cycle, which consists of three distinct phases:

Lengthen (Eccentric): When your foot makes contact with the ground, your muscles lengthen to control your body and slow you down. As your muscles are stretched, they store elastic energy similar to a rubber band.

Load: Load is the transition period when you are at the bottom of a movement and are no longer moving. A faster transition allows more energy to transfer to the third phase.

Anything longer than 25 milliseconds and the energy stored in the Lengthen phase will be wasted as heat.

Fire (Concentric): This is where the fun begins. Your muscles now forcefully contract into the next movement. The elastic energy stored in your muscles is released, which provides a power boost.

With the Lateral Bound, you leap to the side off one leg and land on your opposite leg. You then switch back to the leg you originally bounded from and do the next rep. Repeat 5 times each side and then launch into a 60 yard sprint at max effort. Walk back and repeat.

Wrist Weights: Overload Corrections

Why Wrist Weights are Useful in Throwing Sports.

Light dumbbells have been used in baseball for rehabilitation and catch-all “shoulder programs” for decades. While these modalities have their place, wrist weights do a far better job from a dual-factor perspective – they work well at generating a physiological response and also teach the body to move more efficiently through an overloaded range of motion. 

Wrist weights are “thrown” in a ballistic fashion while being loosely held in the hands. The correct grip is having the fingertips slightly over the wrist weight for support while maintaining a relaxed forearm throughout the exercise. Wrist weight drills are used to train optimal unwinding of the Driveline Phase, going from external rotation with a supinated forearm to internal rotation with a pronated forearm. 

Attempting to actively contract the elbow muscles during throwing is nearly impossible at the high speeds it occurs in.  By using overloaded implements like wrist weights, the technique can be built into the mechanical map of your neurological system, ensuring that it will be integrated into the delivery when combined with other drills provided in this course. 

By continuing to hold on to the wrist weight throughout the ballistic motions, deceleration stress is lowered as there is no separation of the weighted implement from the hand. Instead of a completely reactionary deceleration phase, the ability to feel the mechanical pattern provides very strong proprioceptive feedback – perfect for attempting to retrain human movement patterns. 

While the wrist weight is carried in external rotation and forearm layback, the shoulder is experiencing a similar inertial mass when a baseball is thrown. By simulating this end range of motion while maintaining a loose forearm, you will be able to feel how arm acceleration really occurs from that position, making wrist weights an invaluable tool in any pitcher’s training kit. 

The use of a wrist weight on the glove hand is also instructional, as an overloaded front side helps to feel the pull of the non-throwing side during the Disconnection Phase of the delivery. The quicker and more efficiently the glove arm moves around the torso while the throwing arm begins to load, the more kinetic energy becomes available while straightening out the line of force application. Think of the ideal path of the throwing arm wrist looking something like an ellipse around the torso as viewed from overhead, rather than a circle. 

Strength Training For Baseball and Cricket

Power Bands

Power bands challenge your muscles by creating resistance in multiple directions. You must stabilise against this resistance to maintain the correct movement pattern for each exercise. The result is increased strength in the targeted muscle group. As an added bonus, stabiliser and support muscles, which are often neglected during traditional training, are also strengthened. 

Pallof Press

The beauty of the Pallof press is that it challenges and strengthens the stabilisation action of your abs. That’s because when you do this exercise, it forces your core to resist the rotation or compression of your spine, which forces your entire core to engage.

Set up with a band firmly affixed about chest height to an immovable object. Stand in a line with the band apparatus and turn your body perpendicular. Centre the band on your chest using both hands. Push the band straight out in front of you, keeping your body in a straight-line with no rotation. Hold it in front for 3 seconds, then return the band in complete control to your chest. Do not allow the band to rotate your upper body back towards the machine.

Bear Crawls

Start in a kneeling position with your hands under your shoulders, and knees under your hips. Tuck your toes under, and lift your knees off the floor. Crawl forwards ensuring you keep your knees off the floor. Reverse the direction and crawl backwards. 
Try to keep your back straight throughout this movement. Try crawling to one side and then the other.

Crab Walk

Stand with your feet shoulder-width apart with a resistance band looped under each foot. Create an X by crossing the bands in front of your legs and holding the band in each hand at hip height. Take three lateral steps to the left, then repeat, going to the right.

A progression of this is to then add an arm fly to the movement as you step, by elevating and abducting the shoulders from the torso.

Kettle Bells

While kettlebells and dumbbells can both be used to train similar movements and exercises, kettlebell training has the distinct advantage of being able to produce ballistic movements more easily than dumbbells. These are movements that produce maximum velocity and acceleration over the shortest amount of time.

While the term “functional” gets thrown around a lot – and often too much – kettlebell training is functional exercise at its best. While a lot of machines and certain exercises train our muscles individually, kettlebell exercises train your body as a whole; utilising almost every muscle group working together.

This carries over directly to our lives because of our bodies rarely, if ever, use muscles in isolation, instead of working in conjunction with each other to more efficiently perform tasks, prevent injuries, and build strength. Kettlebell training trains your entire body.

Because the weight of a kettlebell is not centred like that of a dumbbell or barbell, kettlebell training can help build stability with instability.

Kettlebells teach your body to deal with an off-centre of gravity. This means that your smaller stabiliser muscles are activated more than with traditional exercises, thus making them stronger.

Aches and pains are often a result of instability and imbalances. Kettlebell training doesn’t just expose these imbalances but works to correct them through improving coordination, joint strength, and the use of low impact.In keeping the theme of our back and posterior chain, kettlebell training has the ability to improve posture, as well as spinal stability, which will help prevent injuries.

Our posterior chain is responsible for our posture. When these muscles are weak, our posture is normally poor, with our shoulders rolled forward, back rounded over, etc. Poor posture increases our risk for nagging aches and pains, as well as injuries.

Kettlebell training combats this by strengthening the entire posterior chain. A stronger posterior chain helps you keep your shoulders pulled back, with a neutral spine. This is our body’s natural position and reduces our risk of injury issues.

Kettle Row

Single arm kettlebell rows target your back, but that term covers a lot of area. The main muscles in this exercise — properly called the agonists — are your latissimus dorsi, located on the side of your upper back beneath your armpits. In addition, your middle trapezius and rhomboids, which are between your shoulder blades, are also strongly involved and can also be considered agonists.

With a kettlebell at your feet, place your left leg behind you while bending both knees. Your right knee should not extend past your toes. Lean forward at the torso and place your right forearm against your right thigh for stability. Extend your left arm and grasp the kettlebell by the handle so that your palm is facing your right leg. Bringing your elbow back, exhale as 

you raise the kettlebell to the left side of your waist. Inhaling, lower the kettlebell toward the floor and then repeat the movement.

Kettle Waiters Walk

The Waiter’s Walk is a low impact kettlebell exercise that requires a great deal of upper body strength to execute.

The technique for the Waiter’s Walk is relatively straight forward. When done properly, the exercise resembles the way a waiter at a restaurant holds a tray above their head. Beginning at a standing position with one or two kettlebells in hand, simply lift the kettlebell straight above your head, wrist facing forward, handle in the palm of your hand, and with the body of the weight resting on the back of your wrist. Once executed, simply walk forward maintaining a steady pace and keeping the kettlebell above your head. Concentrate on activating the core whilst you do this.

Progressions of this exercise involve holding the shoulder at 45 degrees from the torso and bending the elbow at 90 degrees. this will cause greater activation of serrates anterior.

Kettle Dead Lift

The deadlift adds muscle to your hips, hamstrings, glutes, and back. It also ingrains a good hip-hinge—the process of bending forward at your hips while keeping your lower-back flat and bending your knees slightly—necessary in almost every kettlebell move.

Begin in a standing position with a kettlebell held with both hands. Ensure that your back is straight and stays that way for the duration of the exercise. Allow your arms to hang 

perpendicular to the floor, with the wrists pronated and the elbows pointed to your sides. This will be your starting position.

Initiate the movement by flexing your hips, slowly pushing your butt as far back as you can. This should entail a horizontal movement of the hips, rather than a downward movement. The knees should only partially bend, and your weight should remain on your heels. Drive your butt back as far as you can, which should generate tension in your hamstrings as your hands approach knee level. Maintain an arch in your back throughout the exercise.

When your hips cannot perform any further backward movement, pause, and then slowly return to the starting position by extending the hips.

Kettle Single Deadlift

The single-leg deadlift not only develops hip strength and power, but it also allows the muscles of the hips and legs to act as stabilisers. If you think about it, every time you stand on one leg, you’re using the same muscles for balance and stability that are generally used for force production.

Forcing the body to maintain stability on one leg allows the athlete and coach to see strength imbalances from left to right side.

Hold a kettlebell by the handle in one hand. Stand on one leg, on the same side that you hold the kettlebell. Keeping that knee slightly bent, perform a stiff legged deadlift by bending at the hip, extending your free leg behind you for balance. Continue lowering the kettlebell until you are parallel to the ground, and then return to the upright position

Kettle Bicep Press with Pronation

Pick up the Kettlebell and place into the rack position, with the wrist in slight flexion. Suck the shoulder in’ to set up the shoulder before pressing, the shoulder is now ready to take load and has enough space to prevent impingement. The press will be dynamic, using slight thoracic rotation, slight shoulder abduction (around 20 degrees)this we call scaption (contraction of Scapular Plane Elevation. It refers to lifting the arms from the sides in a slightly forward alignment), but towards the end range this will come into adduction, and full shoulder flexion (which will be relative to each individual). At the wrist, we go from neutral to pronation and full elbow extension.

The lowering of the Kettlebell takes a slightly different path. Control the lowering of the Kettlebell back into the rack position. This would be full elbow flexion, back to neutral wrist (slight flexion) and only shoulder extension (no abduction) or coming through scaption.

Recovery – Stretching

Stretching before and after workouts may prevent injury and can make the difference between having a mediocre workout and a stellar one. The stretches outlined below are more dynamic and involve the muscles regularly used in baseball. Keep the following tips in mind:

  • Before you stretch, warm up by jogging for 5 minutes.
  • While stretching, relax and be patient. Take deep, full breaths to maximise results.
  • Keep your stretches static: NO bouncing or abrupt movements.
  • Optimally complete 3–5 reps of each stretch.
  • Hold pre-workout stretches for about 10 seconds.
  • Hold post-workout stretches for up to 30 seconds

Seated 90/90 Stretch

Benefit: The hips get excessively tight when the lower half is used explosively. The Seated 90/90 Stretch helps to open up the hips and correct sitting posture at the same time.

Method: Sit on a bench with your legs in front of you. Take the outside of one foot and place it at the bottom of your upper leg, just above your knee. Relax the hip and let the knee drop slightly, but not below the level of the stable knee. Place your hands on the outside of the quads on the leg you are mobilizing to gently guide the movement. Be sure to keep a neutral spine during this movement – do not round at the back. You should feel a stretch in the outside of the hip.

Cradle Walks

Benefit: The hips get excessively tight when the lower half is used explosively. The Cradle Walk is a dynamic stretch that opens up the hips like the Seated 90/90 Stretch, but with some added difficulty.

Method: Stand feet shoulder width apart. Take a step forward, bringing the knee upwards and the outside of the foot to the bottom of the quads of the stable knee. Use your hands to gently pull upwards, and do not round at the back to grasp your mobile leg. You should feel a stretch in the outside of the hip.

Wall Quad Stretch

Benefit: The quads are heavily used during the pitching motion as well as most weight training movements. Mobilizing them will ensure optimal range of motion throughout all affected movements.

Method: Stand facing a wall, bracing yourself against it with your free hand. Pull your heel into your butt and stretch your quad out; hold this position.

Ichiro Stretch

Benefit: Combining ankle and hip mobility in a deep squat position creates awareness of the importance of keeping a neutral spine.

Method: Stand feet slightly wider than shoulder width apart. Drop your butt between your legs in an unloaded squat, pointing your toes slightly outwards. Keep your heels on the ground and push your knees outwards while keeping a neutral spine and neck. Use your elbows to push your knees out to gain greater range of motion at the hips.

Cobra Pose

Benefit: Most athletes do not have a good idea of what a neutral or slightly extended lumbar spine feels like. The Cobra Pose places them in a great position to create awareness and to increase mobility at the thoracic spine.

Method: Lay prone on the ground, face down. Place your hands in a push-up position, slightly inside your shoulders’ width. Press upwards, raising your torso while your legs stay pinned to the ground. Control your breath and stay at the top position at end range of motion.

Elbow Extension Stretch

Benefit: The muscles of the forearms get tight after all throwing workouts, restricting the range of motion at the elbow and increasing the chance of injury. The Elbow Extension Stretch helps to regain mobility in the affected area.

Method: Stand tall and raise one arm in front of you, palm facing upwards. With your other hand, grab your fingers and pull the elbow and wrist into extension while straightening your elbow. You’ll feel a stretch on the top of the forearm.

Cross-Body Stretch

Benefit: This is a less aggressive stretch than the Sleeper Stretch and works as a solid alternative.

Method: While standing, reach over your glove side shoulder with your throwing arm. Gently pull your throwing elbow across your body until you feel a stretch in the posterior shoulder.

Verified by MonsterInsights